How-to Replace Garage Door Torsion Springs
1. Measure the spring size
a. Measure the length of the spring(s). From the broken spring, measure the overall length of the coil from left to right (coils only- not the end cones). Subtract the gap where broken. This first measurement is usually rounded to the closest ½ inch. Note- do not measure the length of the unbroken spring.
b. Measure the i.d. (or inside diameter). Most residential springs will have a 2-inch i.d. (1 ¾ inch is more rare).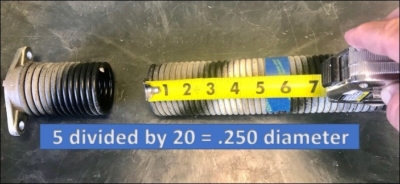
c. Determine the wire diameter. Precisely measure 20 coils with a tape measure (from the broken spring, or spring not under tension). Convert the fraction into a decimal. Divide this number by 20. The result will be an accurate measurement of the diameter of one single coil. This number is very important. If done correctly, the diameter should fall into the following predetermined sizes: .192, .207, .218, .225, .234, .243, .250, and .262.
d. Don’t fudge the spring size! Many DIY’ers incorrectly assume that they can simply buy an oversized spring and wind it less turns. THIS WILL NOT WORK! A spring will need to be wound a minimum number of turns to elevate the garage door to the proper height. Reducing the turns on the spring will cause the garage door to go up part way, then get very heavy, usually causing one or both cables to get tangled. This creates a lot more work and is considered a difficult repair for a DIY’er.
e. Use the correct format for proper reference of the spring size: coil diameter x inside diameter x length. A common example would be .207x2x22.
2. Order your spring(s)
a. Place an order for your required torsion spring size from a trusted garage door supplier https://www.parts4garagedoors.com. You may want to make a list of other items and order them at the same time to save on shipping costs. Common parts that go along with spring replacement are the following: winding bars, torsion cables, cable drums, bearing plates, rollers, and hinges. Most shipments will be received in 2 to 3 days.
b. Some garage doors have a single spring. Most single springs can be converted to the equivalent in a dual spring system for longer cycle life. This is optional. Most dual springs will last 25% to 35% longer. Your spring supplier will be able to assist you with providing the correct conversion.
c. If you have 2 torsion springs, then we recommend ordering both, as they should be replaced at the same time. Once one torsion spring has broken, the other spring is very likely to break soon. This is the standard garage door industry practice.
3. Set aside the tools needed
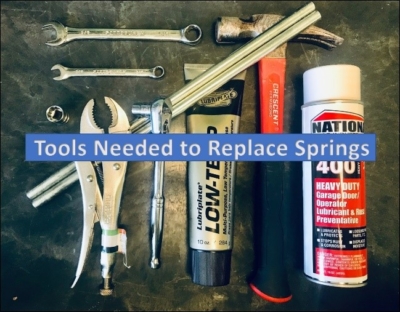 a. Winding bars- 16 inches to 18 inches long for proper leverage. Use ½ inch o.d. (outer diameter) cold rolled steel.
b. 7/16- 12 point socket, or 3/8 inch open end crescent for use on the set screws.
c. 9/16 socket and 9/16 open end crescent for use on the spring bolts
d. One set of vise-grips. Use straight or curved mouth variety.
e. Flat file to grind down high spots from torsion tube (where set screws may have been tightened too much).
f. Hammer or rubber mallet to lightly tap bearing plates
g. Spray lubricant or grease to allow tube and parts to slide
4. Safety items
a. Mechanic’s gloves
b. Eye protection
5. WARNING- GARAGE DOOR REPAIR CAN BE VERY DANGEROUS!
a. DIY repair on a garage door should only be performed by confident and very capable personnel, with a complete understanding of the risks involved.
b. Following incorrect procedures, or using incorrect or substandard tools, can result in severe injury or death.
c. Install at your own risk!
6. Unwind old or unbroken torsion spring(s)
a. Prepare to loosen the spring’s set screws using the following procedure: Fully place one bar in the winding cone hole most pointed towards you, lift upwards a few millimeters until you can place the other winding bar in the downward facing hole. Allow the weight to shift to the bar on the bottom side and let the full tension rest against the top of the garage door (or horizontal strut). Remove the first bar.
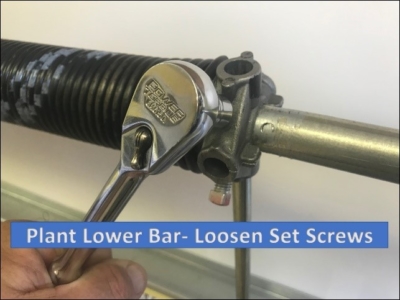 b. Loosen the set screws- With one hand holding the lower winding bar steady, use a 7/16- 12 point socket wrench to slowly loosen the 2 set screws. The spring will now be ready to unwind from the tube in a downward direction.
c. Unwind the spring- Place the other winding bar once again into the winding cone hole most pointed towards you. Hold firmly as you lift slightly allowing the bottom bar to be removed. Allow the upper bar to rotate slowly downward till the tension is again held by the door or strut. Place the free bar in the hole 90 degrees above. Slowly repeat this process approximately 30 quarter turns, or until the entire tension has been diminished.
7. Remove existing spring(s), Slide new ones into place
a. Make sure all springs have been completely unwound. As evidence, both cables should now be completely slack.
b. Loosen set screws from the broken spring.
c. Unbolt the spring(s) from the center bearing plate using a 9/16 socket and 9/16 crescent wrench.
d. Loosen the set screws on both the left cable drum and right-side cable drum. Slide the drums 6 to 9 inches inward towards the spring(s) (to allow room for torsion tube to slide).
e. Prepare to slide the torsion tube by spraying lubricant on the tube where it will slide through the bearings.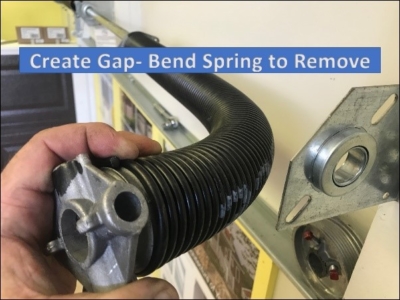
f. Slide the torsion tube either direction so that one end comes through the end bearing plate creating a 6 to 9-inch gap.
g. Slide the cable drum and old spring off the torsion tube, bending the spring as needed for ample clearance.
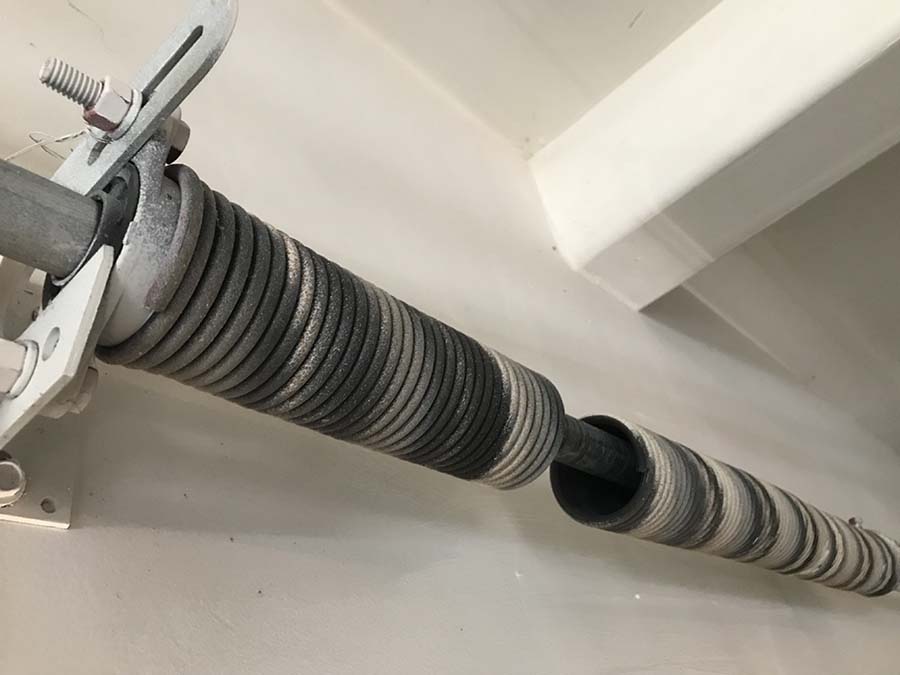
h. Note- all torsion springs have a left or right wind orientation. It is imperative to install your spring on the correct side. Springs are color coded red or black. You will find a small color splotch at the very end of the spring on the winding cone. Install a spring with red marking on the left side if you are standing in the garage, looking to the outside. The spring with the black marking will go on the right. Once in place, you can confirm the correct positioning by observing the tail end of the coil, nearest the winding cone. If you rotate the spring from on the tube, or even in your hand, until the beginning of the coil is facing you- the tail should be pointing in the downward direction.
i. Slide the new spring and cable drum back on the tube. Push the tube back through the bearing plate to the original position.
j. Repeat this process of sliding the tube the other way, if there is a spring on the opposite side.
8. Preparation for winding the spring(s), Setting the cables in place
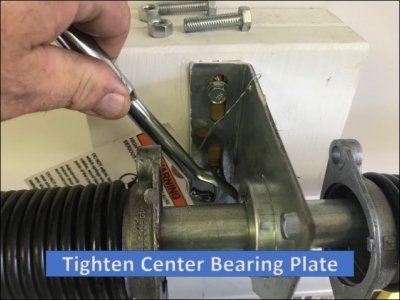 a. Always do a pre-check of the center bearing plate that the spring gets bolted to. It should be tight into the wall using 2 or 3 lag screws that land squarely into a stud or header. Tighten as needed (don’t overtighten). Add another lag screw if necessary (predrill a pilot hole).
b. Use the 2 bolts to fasten the spring(s) to the center bearing plate.
c. Double check the position of the long torsion tube. If the set screws from the spring(s) or cable drums had created large divots, then it is sometimes best to offset the tube by 1.5 to 2 inches. It does not need to be in the exact position as before.
d. Set one of the torsion cables. The cables need to be in place before the spring(s) are wound. To do this, push the cable drum tight against the bearing plate, and then tighten the 2 set screws on the drum (tighten till the screw 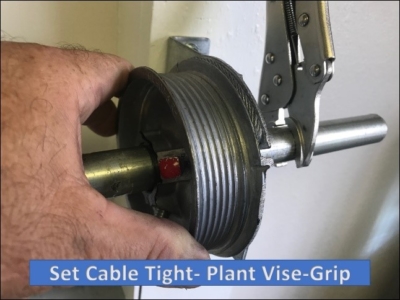 touches the tube, then an additional ½ to ¾ turn). Insert the end of the cable into the slot at the outer edge of the drum. Make sure it is seated in there firmly, and that there is no prior damage to the drum. Rotate the drum toward you and downward to reel in the cable. Once it is straight, hold it in position with one hand while planting a vise-grip on the topside of the torsion tube, so that it holds against the wall, sheetrock, or stud. When you let go- everything should stay in place (the cable and the vise- grip).
e. Set the other cable. On the other side, push the drum tight against the bearing plate. Insert the end of the cable into the slot at the outer edge of the drum. Rotate the drum toward you and downward until the cable is straight. Hold the drum in this position with one hand, and tighten the two set screws. Once tightened the cable will hold its position (an additional vise-grip is not needed).
9. Winding the torsion spring(s)
a. Determine, in advance, how many ¼ turns of tension your spring(s) will require. To do this you will need to know how tall your door is, and the circumference of your cable drums (most residential drums are a 12 inch circumference). A 7 ft tall garage door with a standard 12 inch drum, will require 29-30 quarter turns on the spring. An 8 ft garage door with a standard 12 inch drum, will require 33-34 quarter turns on the spring. The equation for a garage door with 12-inch drums is:
Q= 4F +1 or 2. “Q” is quarter turns, “F” is the height of the door in feet.
b. Safety first. It is highly recommended to wear mechanic’s gloves and eye protection as a precaution. Make sure you are standing on a stable ladder or surface. Distractions such as pets and young children should be cleared from the room prior to working if possible.
c. Please note. Each spring will be wound individually, in the upward direction to add tension. Warning- do not wind the springs with the winding bars held too closely to your head or face. Keep your distance. Stand to the side, and wind in line with your outer shoulder.
d. Wind the spring. Set one of the winding bars in a pocket, or within easy reach. Use both hands to wind a full 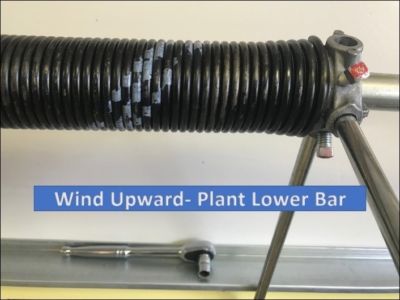 revolution of the spring in the upward direction. Hold the spring in this position, while using the other hand to plant the winding bar into the lower hole of the winding cone. Allow this bar to rest against the top strut, or the top of the door. It should be able to stay in this position hands free. Keep a running count of the turns as you go. You are currently at 4 quarter turns. Next, rotate the bar upward 90 degrees, and plant the other bar firmly into the bottom position, and let it rest against the door. You are now at 5 quarter turns. If you use this method of winding, then you can always use your strong arm to tension upwards, and your off hand to securely place the next winding bar at the lower position, then rest momentarily. Switch hands and keep using the same hand to tension upward. You can take a break at anytime you feel the need- just keep track of the running count. Repeat this procedure till you have completed the predetermined quarter turns. Now you can tighten the two set screws to secure the spring to the torsion tube. Note- do not tap or manually stretch the springs as some online tutorials have suggested. The springs will automatically lengthen as needed, as they are tensioned. After you have tightened the set screws, place the free winding bar into the hole above and rotate upward a very small amount (a millimeter or two), in order to remove the bar that is pinned against the door. Repeat this process to wind the second spring, if your garage door has two torsion springs.
 e. Remove the vise-grip from the torsion tube.
f. Do another visual check to make sure that the torsion cables are loaded onto the drums correctly.
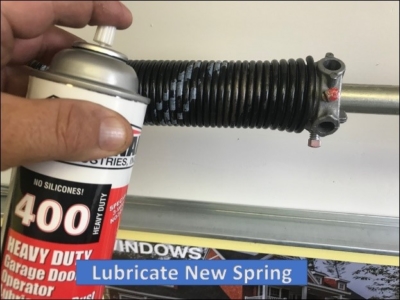
g. Lubricate the springs, bearing plates, hinges, and rollers with an approved garage door spray lubricant. Do not use grease as it attracts dust. Avoid spray lubricants with silicone as it is detrimental to parts with ball bearings.
10. Test the spring tension, Test the balance of the door
a. Disengage the garage door from the automatic opener by pulling down on the red safety rope or removing the cotter pin that connects the j-bar from the garage door. If necessary, pull the j-bar manually back toward the motor.
b. Lift the garage door slowly to the halfway position and see if you can find a spot where it will balance on it’s own. This is a test of overall good balance, but it’s also acceptable if it almost stays.
c. The most important test for proper spring tension is for the garage door to hold it’s position when lifted to the opened height. Raise the door so that the bottom just clears the overhead jam. Does it stay in place? If so, then your spring tension is great. If the door wants to fall down a few inches, then stops, you will want to take the time to add more tension to the spring. Every three inches- is a quarter turn that should be added to each spring.
d. Note- operating a garage door that is too heavy or under-tensioned, can, and most likely will, result in your cables getting tangled up on the drum, pulling your garage door crooked and off track.
11. Increasing and decreasing the tension of the spring(s) if needed
a. Start by always placing a vise-grip onto the top of the torsion tube, against the wall, sheetrock, or stud. This will help keep the cable from getting tangled, in the event that the winding of the spring was to also turn the tube slightly.
b. Insert a winding bar in the middle position (pointing at you), and wind upward just enough (millimeters) to insert the other bar in the lower hole of the winding cone. Once the weight has shifted to the lower bar, then remove the upper one, and allow the lower winding bar to rest against the top strut or garage door.
c. With the winding bar in place, you can now slowly loosen the set screws from the spring being adjusted. Loosen completely so that the spring can be wound without scraping or pulling on the tube.
d. Add the additional quarter turns as needed, using the technique previously discussed (9d), to balance the garage door correctly (usually just one or two quarter turns should be added). Too many additional quarter turns required would indicate that the spring size may not be correct. Tighten the set screws and remove the vise-grips. Repeat the same process if another spring needs to be adjusted.
e. Note- If there are two torsion springs, you may want to adjust one at a time, then test the balance of the door. It is acceptable, and sometimes ideal, for one spring to have an additional quarter turn ahead of the other.
f. Reduce the tension of the torsion spring(s) if too much lift is being applied. The garage door should be able stay closed and not lift up on its own. WARNING- there is a minimum amount of quarter turns that must be used to elevate a garage door to a given height. Tensioning below the minimum turns will allow the cables to get tangled and the door to go off track. Use the formula in 9a of this manual, and do not go below the calculated turns!
12. Adjust your garage door opener as needed
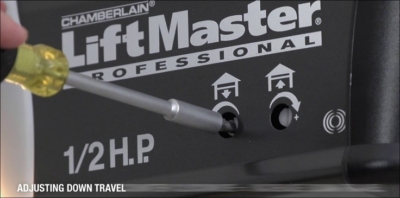 a. It is highly recommended to readjust the settings of your automatic garage door opener every time you replace or adjust your torsion springs. Consult your owner’s manual to make adjustments to the limits (how far the door opens and closes), and the force (how much horsepower is applied during normal function of the garage door).
b. The original settings were programmed according to the conditions of the garage door at the time of installation, and may now require some adjustment.
c. Note- make sure that the “open limit” of the garage door opener elevates the bottom of the garage door precisely to the height of the jam (or header). Opening the door too high above the opening is a common cause of the cables getting tangled and the garage door coming off the track.
13. Annual safety check
 a. You should perform a visual and manual test of the garage door every 6 months. Stay on top of problems and replace broken parts immediately.
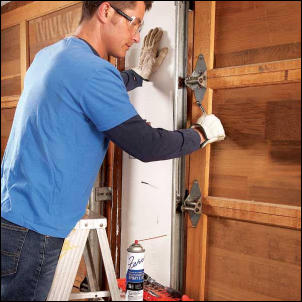
b. Visual check- be on the lookout for loose screws or nuts (tighten), cracked panels (remedy with a strut brace), cracked hinges (replace), frayed or rusty cables (replace), worn out bearings (you will see excessive black residue around the edges), and noisy springs (lubricate as needed).
c. Manual check- disengage the opener from the garage door. Then, open and close the garage door testing for ease and smooth operation. Notice if there’s excessive friction or scraping along the track. The house or concrete slab may have settled. A slight adjustment in the track as needed will often be enough. Do a a balance test of the garage door (see 10c). Readjust the spring tension as needed.
d. Lubricate the springs, bearing plates, hinges, and rollers with an approved garage door spray lubricant. Do not use grease as it attracts dust. Avoid spray lubricants with silicone as it is detrimental to parts containing ball bearings.
This content was published by Parts 4 Garage Doors 2019. All rights reserved.
Houston: 11020 Katy Freeway #116 Houston, TX 77043 832-834-3477
Channelview: 16023 East Freeway #56 Channelview, 77530 832-728-6540